After a recent server hiccup that I’d deem ‘larger than what I’d call acceptable’ I was forced to think about scaling and high availability. My old setup was as basic as you can get. After migrating from a shared hosting platform to AWS, I spun up a small instance on Lightsail for a couple of reasons. I was eager to try it out as it was new to me and it looked very easy to get off the ground with. It is, but with a few caveats which I’ll go into throughout this post.
I went to AWS because I knew I’d eventually want to move beyond Lightsail and further into the big, bad AWS ecosystem and explore some of the other services available. But Lightsail offers a very easy way to get a server up and running for folks that maybe don’t have experience with AWS or just don’t want the complication of EC2, security groups, VPC, subnets, dozens of instance types, etc…
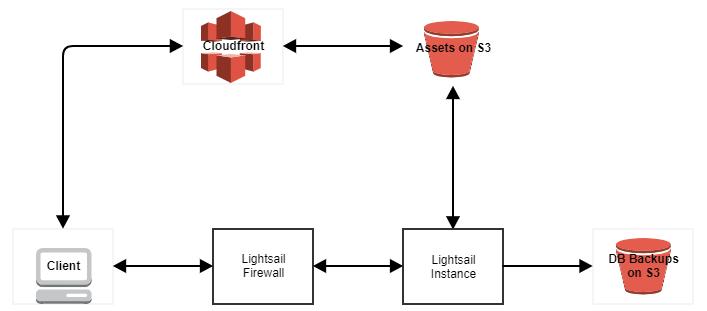
The old setup. A small Lightsail instance with a couple of basic firewall rules. To save instance disk space and hopefully speed up loading time, website assets are stored in an S3 bucket with CloudFront distributing them to website visitors. For those entirely new to AWS, S3 is a basic file storage service and CloudFront is a content delivery network (CDN). The CDN has multiple locations worldwide and caches files from the S3 bucket when website visitors request them. There is a much longer explanation for how CloudFront works, possibly too lengthy to go into here. Maybe in a future post.
My little, cheap as chips Lightsail instance was humming away nicely until it wasn’t. A spike in visitors to one of the sites hosted on it caused a little meltdown. It did recover of course, without any intervention I’ll boastfully add, but it got me thinking about the people that are getting off the ground with their apps, wondering how they’ll move beyond that first little server that can’t really hack it anymore. Potentially even worse than that, startups without any IT people or developers that know a bit of AWS stuff might not actually know about any problems until one of their customers or potential customers calls to report the website or app is down.
I’m not “Scaling for your first ten million users” here, I just want to ride out the peaks and ensure that if something does go down, it wasn’t a server resource capacity issue.
But I’m not going to talk about any of that hypothetical stuff, I want to take a bit of time to show how I moved onto something more future-proof.
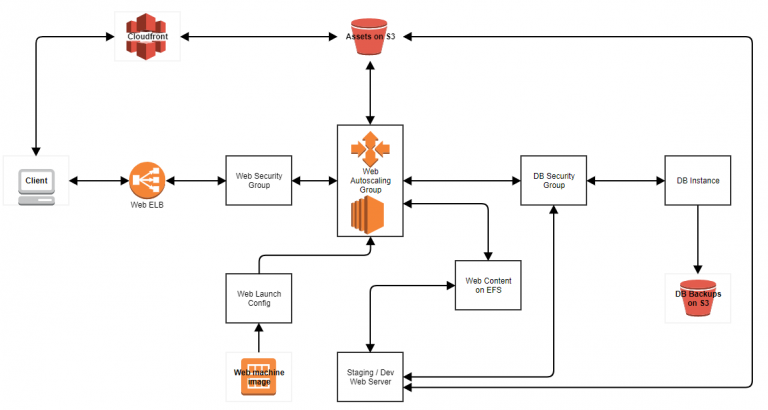
In Summary;
What I’m keeping – S3 (Assets & DB backups), CloudFront.
What I’m not keeping – everything else.
Moving away from Lightsail.
Lightsail, even though it’s a service within AWS, isn’t tightly integrated into the ecosystem. This is where the caveats I mentioned above start to come into play. I initially had the possibly flawed plan of taking my existing instance on Lightsail and just ‘moving’ it to EC2. But it’s not quite so straightforward. What I can do is take a snapshot of the instance and then export that snapshot to EC2.
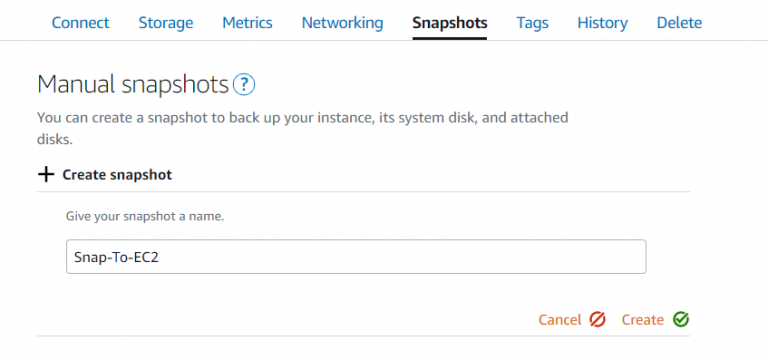
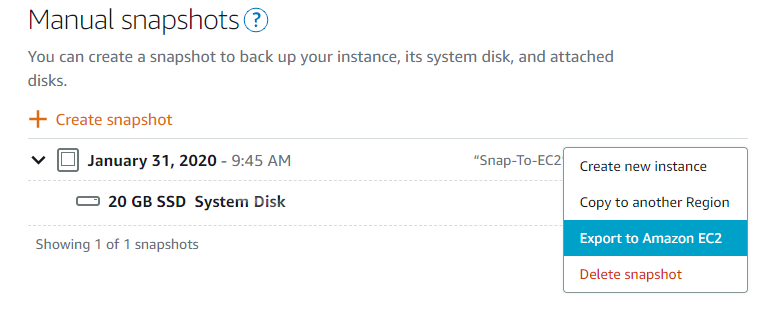
I got the usual warnings/disclaimers about security (I’d need to review firewalling again later) and my Lightsail SSH key would no longer work, so I’d need to create and apply a new one when I launch the image in EC2.
As part of the export to EC2, an AMI (machine image) is also created. Once the export is finished, you can launch an EC2 instance from that AMI. Not overly difficult, just a little time consuming. Also somewhat convoluted if you’re one of those people above that don’t understand a lot of the inner workings of AWS.

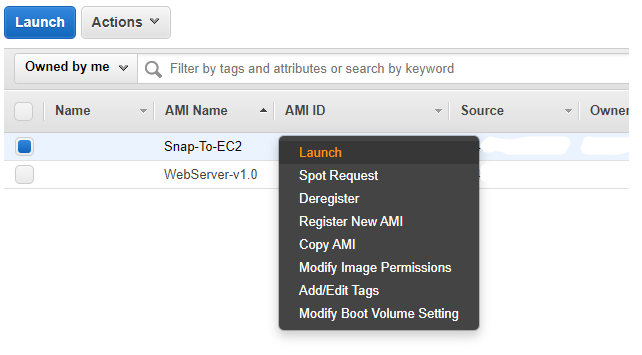
Once the Lightsail export is done, it’s about as simple as right click on the AMI and click launch. I had to do all the normal instance launch stuff like picking an instance type and defining security groups. One important thing to note here is that the Lightsail snapshot is exported to EC2 in the same AWS region as the original Lightsail instance. Neither snapshots nor AMIs have global scope.
Having gone through the above, I then decided that I really didn’t want an exact copy of my existing instance. Changes in the infrastructure were planned that’d make my Lightsail instance obsolete.
Building the new instance
Once I had decided that a brand new instance was needed, I launched a small Ubuntu instance (my distro of choice for the last few years) and set about doing all the normal security hardening and services setup. I installed Nginx, PHP, some PHP extensions and a few more tools I’d need in the future to manage the instance. There is no magic here and there are multiple guides online. To be certain I don’t forget to do something, I usually have one of Digital Ocean’s excellent tutorials open in another window.
Another way I could have done this is to use a standard AWS machine image and employ any one of the configuration management tools; Ansible, Chef, Puppet to do all the configuration and installation for me. But this is just a web server and won’t see huge rate of configuration change. Tooling to manage change is probably overkill right now.
Taking advantage of EFS
I’d read a couple of blog posts on EFS, a relatively new managed file system service from AWS. I wanted to give it a try, but also wanted to be able to step back from it if it didn’t make sense in the long run. I created a new file system across all three availability zones in my chosen region, because ultimately I’ll end up load balancing across all three AZs if the shit hits the fan again. There’s nothing particularly difficult in creating the file system, I pretty much just took default options the whole way through.
Security group rules caught me out initially, I had forgotten to allow NFS traffic inbound from the security group that the web instances will use. I got a timeout when trying to mount the file system from the Ubuntu instance so the issue was immediately obvious.

Web instance security group tag partially obfusticated in the above screenshot because of my (crippling) healthy web security paranoia.
On the topic of mounting EFS in the instance, there are a couple of ways to go about it. On Amazon Linux, all the tools are already installed. In Ubuntu, I had to install EFS helper and then just put the mount point into /etc/fstab to have it mount on startup. I did a quick write test to the file system and everything looked good. I’ll give it a little time to see if EFS will work for me and more importantly, how it’ll affect my monthly bill.
As a last act on EFS setup, I cloned the git repo containing my web content to the EFS mount point and configured Nginx to serve from that location.
Auto scaling and load balancing
With my Ubuntu instance setup complete, I powered it down and created an AMI.
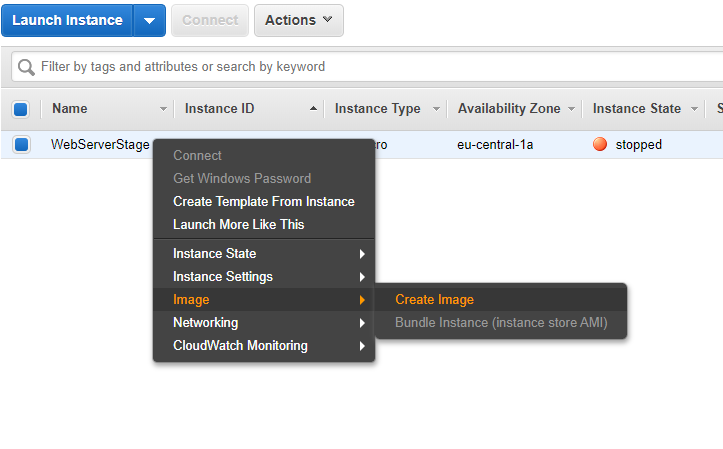
After this, I created a launch configuration in the EC2 dashboard to use the new AMI and set a few specific options. First, I changed the instance type. I want to try out some of the new(ish) t3a instance types. Second, I disabled public IP address assignment on the instances launched by this configuration. The only access to these instances should be through the load balancer I’ll create later. Lastly, I duplicated the existing security group applied to the staging instance (the one I created the AMI from above) and removed SSH access. I won’t need to log in to the production instances so reducing the potential attack surface a bit.
Next, I created a classic load balancer. Gave it the same security group as above and changed the health check to ping the HTTP port of the web instances and look for a specific URL. When the scaling group I’ll create next scales up, it’ll add the new instance to the load balancer and once HTTP becomes active and the URL I’ve given to it is reachable, the load balancer will start sending traffic to the instance.
I’m not adding instances to the load balancer right now because, well, there aren’t any. When I create the auto scaling group next, I’ll point it at the load balancer and it’ll handle the registration and deregistration of instances.
For the auto scaling group, I decided to try out the new (and improved?) method of first creating a launch template and applying that to an auto scaling group. In theory, I can version launch templates if I decide to change instance type, image or other options so I can swap out instances with less effort. Also, it’s another new thing to play with. Mostly that.
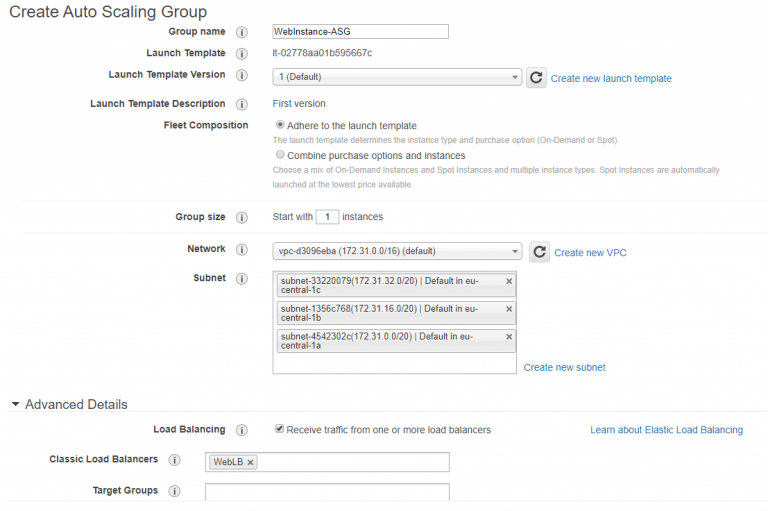
Hopefully the above isn’t too much of an eye chart. I’ve given the ASG a name, picked my launch template version from the list (or choose ‘latest’ which always takes the newest) and defined my VPC and subnets. As I mentioned above, I’ve linked the load balancer to the ASG so all the load balancing wizardry will be taken care of.
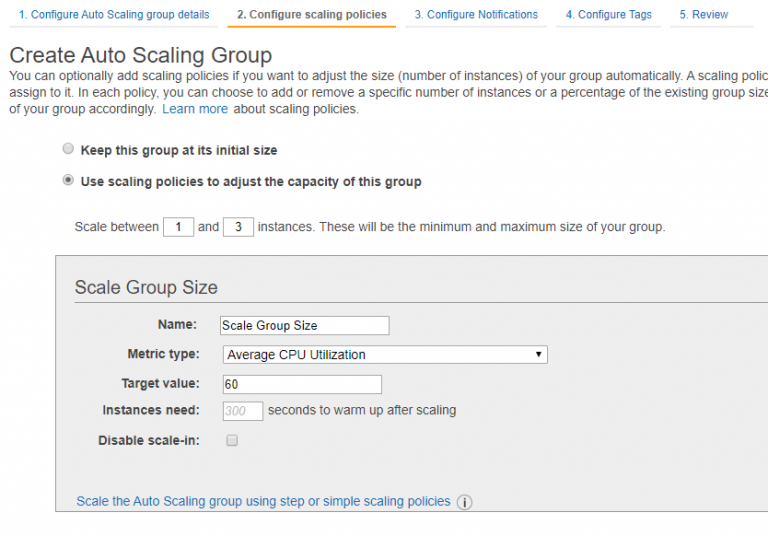
For the scaling policy, I tried to strike a balance between being a cheapskate and having unavailable websites. Usually, scaling at about 40% usage is good for availability. Up to 70% is good for cost. So I picked a number in between.
For notifications, I want to know when a scale out, scale in or instance failure occurs. I created a new SNS topic here and gave it my email address. I might change this out later on to log elsewhere, depending on how spammy it gets.
I finished creating the ASG and it fired up the first instance. Looking at the load balancer, the new instance was out of service and so the load balancer never kicked in. A few minutes of head scratching later, I realised I’d been caught again by my old friend the security group. Extra points if you can guess what I’ve done without rereading the entire post.
No? When I duplicated the security group, I forgot to add an inbound NFS rule on my security group attached to the EFS file system. So instances launched with the new security group couldn’t mount EFS. With that little issue resolved, I relaunched the instances (deleted them, the ASG took care of launching new ones) and hey presto, instance in service.

I also verified that instances were launching in separate availability zones by temporarily scaling the group to 3 instances.
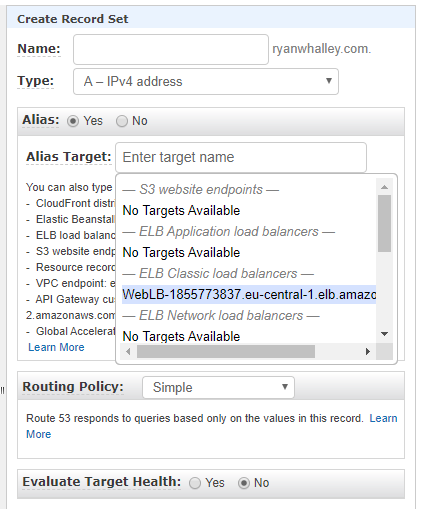
Finally, because WebLB-1855773837.eu-central-1.elb.amazonaws.com doesn’t exactly roll off the tongue to advertise as your website address, I created a record set in Route53 to point to the load balancer.
Database
This part is going to be a little anticlimactic after what I’ve just done above. For the database, I launched a small Ubuntu instance with an IAM role to allow it to interact with an S3 bucket I’m going to use in the next step to send database backups to. For those unfamiliar with IAM, its basically access & permissions management. Like the web instance, the DB instance is internal only. It does not have a public IP address.
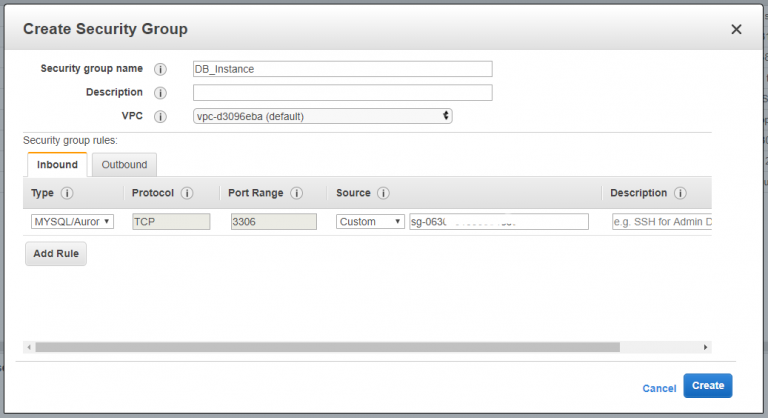
I configured all the basics, installed and configured MySQL, then did some security hardening. Nothing too taxing. I also applied a new security group to the instance that only permits MySQL traffic to and from the web instance(s).
I could have gone crazy here and gone with Amazon’s RDS to host the MySQL databases. That’d give me all kinds of backup, availability and scalability options out of the box. Nice option to have, but complete overkill for me. It’d also be a hell of a lot more expensive that running a small Ubuntu instance. In the future, if I find I’m getting bottlenecks on the database instance or the MySQL service is complaining about resources, I’ll just take a short period of downtime, shut down and snapshot the instance, then launch a larger instance from that snapshot.
Backup and monitoring
My requirements here are easily satisfied. My databases are backed up by a very simple bash script I wrote to regularly dump the databases to files, then move those files to an encrypted S3 bucket. The S3 bucket is lifecycled so only the last 10 backups are kept. My rate of change is low, so I might even change that to store fewer files. The files are tiny, so it’s not really costing me anything to store them.
The web assets are also on an S3 bucket, being stored in the standard storage tier. That has something crazy like seven 9’s of availability/durability so I’m not overly worried about anything disappearing. Even if I mistakenly delete something, I can easily upload it again from my PC/laptop/phone/ipad. I could enable versioning on the bucket if I was super paranoid.
The web code is stored in a private repo on Github. I briefly thought about moving it to CodeCommit on AWS but came to the conclusion that it was more trouble than it’s worth.
Monitoring is also pretty relaxed. With the new auto scaling group, I’m notified when a scale up/down occurs or if an instance has failed to launch or terminate. That’s useful because I know immediately if I’m getting a spike in traffic or if something has gone horribly wrong. I’m also notified every time a database backup finishes successfully. All of this is using the Simple Notification Service (SNS) and reports are sent to my email address.
I take a look at CloudWatch every now and then if I want to see a bit more about what’s going on with the instances or if I want to keep an eye on my S3 usage. I’m not currently overly fascinated with creating custom metrics or turning on enhanced monitoring. As before, that’d be overkill. I may create an alarm within CloudWatch to monitor if the healthy instance number in the load balancer goes to zero and report it to an SNS topic. That way I’d know if all instances are down and/or if they just stop serving traffic for some reason.
Wrap up
I chose to set everything up manually for a few reasons. Chief among those is my love of knowing how everything is put together in case/when I need to replace or upgrade a bit of it. I realise I could have clicked a couple of buttons, saved myself some time and just got this all going on Elastic Beanstalk. I love EB for ease of setup. For working with several environments. For dev, staging and production. Blue/Green deployments. CI/CD. All that stuff. I know all the buzzwords. That being said, if I needed repeatable environments I think I’d just go the infrastructure as code route and use CloudFormation or Terraform to manage the environments outside of anything that could be potentially restrictive, like Elastic Beanstalk.
I could have also containerised the web instance and run it on EKS. I could have run it on ECS. As with many things, there are many ways to achieve the same goal. I’d like to think I took something simple that was approaching it’s limits and scaled it without transforming it or complicating it too much. I also added a dev/staging server that I can power on and work on the code without interrupting production. Additionally, it’s all properly version controlled now. It’s also possibly a bit more secure.
It’s now possible for me to do OS patching and upgrading without taking the site down. I can introduce a new custom built AMI into the mix and do a rolling redeploy of the web instances without downtime. I can probably do a lot more, I just haven’t really thought about it yet.


